Nutella Stuffed Brown Butter & Sea Salt Chocolate Chip Cookies

*Homer Drool*

Oh my.

I have a lot of cookie recipes.  Chocolate chip, double chocolate, oatmeal raisin, snicker doodle, macaroon, unbaked… Whatever.  None of those matter anymore.  Not since I found this recipe.  Quite frankly, this is the cookie legends are made of.  This is the cookie every cookie wants to be when they grow up.  When I first read the recipe and the reviews, I thought it was different and probably good but I thought people were exaggerating.  I mean really, how good could this cookie be?

Let me tell you.  They were not exaggerating.  The original recipe can be found here, at ambitiouskitchen.com, but I’m posting here so I don’t ever lose it and because I will make it again and again (although I probably shouldn’t).

The browned butter gives these an amazing, nutty, caramelly flavour… the dough almost smells like butter tarts.  The original post links to a great tutorial at simplyrecipes.com on how to properly brown butter (the last thing you want is to accidentally burn a cup of butter!).

These are more labour intensive than a regular cookie.  But they are worth it.  Just be prepared to take some time to let the dough chill for a couple hours, and putting them together takes some effort too – the dough is crumblier than I thought but the cookies are soft and delicious!  Make sure you don’t over bake and don’t skimp on the sea salt!

Ingredients
  • 2 1/4 cup all-purpose flour
  • 1 1/4 teaspoons baking soda
  • 1/4 teaspoon of salt
  • 2 sticks (1 cup) butter
  • 1 1/4 cup packed dark brown sugar (I only had light on hand and they were still delicious!)
  • 1/4 cup granulated sugar
  • 1 large egg plus 1 egg yolk
  • 1 1/2 teaspoons vanilla extract
  • 1 tablespoon plain greek yogurt
  • 3/4 cup semi-sweet chocolate chips
  • 1/2 cup milk chocolate chips (I ended up using 1 1/4 cups semi-sweet and 1/2 cup coarsely chopped dark chocolate since it was all I had on hand)
  • 1/2 cup dark chocolate chips
  • 1 jar of Nutella, chilled in refrigerator
  • Coarse sea salt for sprinkling
Instructions
  1. Whisk together the flour, baking soda, and salt in a bowl and set aside. Melt butter in a saucepan over medium heat. The butter will begin to foam. Make sure you whisk consistently during this process. After a couple of minutes, the butter will begin to brown on the bottom of the saucepan; continue to whisk and remove from heat as soon as the butter begins to brown and give off a nutty aroma. Immediately transfer the butter to a bowl to prevent burning. Set aside to cool for a few minutes.
  2. With an electric mixer, mix the butter and sugars until thoroughly blended. Beat in the egg, yolk, vanilla, and yogurt until combined. Add the dry ingredients slowly and beat on low-speed just until combined. Gently fold in all of the chocolate chips.
  3. Chill your dough for 2 hours in the refrigerator, or place in freezer for 30 minutes if you are super eager, although I cannot promise the same results if you do this.
  4. Preheat the oven to 350 degrees F. Once dough is chilled measure about 1 1/2 tablespoons of dough and roll into a ball. Flatten the dough ball very thinly into the palm of your hand. Place 1 teaspoon of chilled nutella in the middle and fold dough around it; gently roll into a ball — it doesn’t have to be perfectly rolled! Make sure that the nutella is not seeping out of the dough. Add more dough if necessary. Place dough balls on cookie sheet, 2 inches apart and flatten with your hand VERY gently. (Really only the tops need to be flattened a bit!)
  5. Bake the cookies 9-11 minutes or until the edges of the cookies begin to turn golden brown. They will look a bit underdone in the middle, but will continue to cook once out of the oven. Cool the cookies on the sheets at least 2 minutes. Sprinkle with a little sea salt. Remove the cooled cookies from the baking sheets after a few minutes and transfer to a wire rack to cool completely. Repeat with remaining dough.

Easy Christmas (and other holiday) Mason Jar Gifts

My favourite gifts to give and receive are homemade ones! But it takes a long time to hand craft gifts for everyone! I always have good intentions of knitting and sewing fun little ornaments, pairs of socks and slippers, or mittens and scarves for all of my friends and family, but it seems like time always slips away from me and I end up at the mall, searching for something equally nice. Here are a few “Gifts in a Jar” that don’t take that long to make, and don’t require a lot of time in a crowed mall – you can usually find everything in your cupboard or at the grocery store. Basically, you’re creating all of the goodness of homemade baking and goodies, with all the ingredients packaged neatly in a mason jar. It’s fun to receive, and easy for the person receiving it to whip up some homemade cookies or hot chocolate, which is great if the person you are giving it to doesn’t have a lot of time for holiday baking. All you need to make sure you have on hand is some mason jars – these recipes use 1 L and the 250 mL sizes (you could do other sizes of jars too, just make sure the ratios are still the same!).

On the left, chocolate chip cookies in a jar, on the right, Christmas cocoa!

Christmas Cocoa

Ingredients:

1 cup sugar

1 cup unsweetened cocoa

1 cup powdered milk

1/2 tsp salt

1/2 cup miniature chocolate chips

1/2 cup miniature marshmallows

In a 1 L mason jar, layer the ingredients in order, beginning with the sugar. Decorate the jar by wrapping ribbon around the lid, or using a fabric square and elastic over the lid. Attach the following recipe for the recipient:

Mix contents in a large bowl. For each serving, place 1/3 cup cocoa mix in a mug and stir in 1 cup boiling water or milk. Store remaining mix in an airtight container.

Chocolate Chip Christmas Cookies

Ingredients:

1 3/4 cups flour

3/4 tsp baking soda

3/4 tsp salt

3/4 cup packed brown sugar

1/2 cup sugar

1 cup chocolate chips

1/2 cup Smarties, M&Ms or rainbow chocolate chips (use red and green to make Christmas cookies! Or, if you don’t have any, just substitute chocolate chips)

In a bowl, whisk together flour, baking soda and salt. In a 1 L mason jar, layer the ingredients, starting with the flour mixture, then the brown sugar, sugar, chocolate chips and M&Ms, pressing firmly after each layer. Decorate the jar (see above recipe for suggestions) and attach the following recipe for the recipient:

Preheat oven to 375 F. Beat 3/4 cup softened butter, 1 large egg and 3/4 tsp vanilla in a large mixing bowl until blended. Add cookie mix and stir to combine. The dough will be fairly stiff. Drop rounded spoonfuls of batter onto a greased cookie sheet. Bake for 9 to 11 minutes or until golden brown. Cool on cookie sheets about 2 minutes, then transfer to wire racks to cool. Makes about 2 dozen cookies.

Soup in a Jar

Ingredients:

1/4 cup red lentils

1/4 cup dried assorted mushrooms, coarsely chopped

1/4 cup wild rice

1/4 cup split yellow peas

1/2 tsp celery salt

1/4 tsp onion salt

1/4 tsp garlic salt

Layer the ingredients, starting with the red lentils, in a 1 cup (250 mL) mason jar. Decorate the jar and attach the following recipe for the recipient:

In a large saucepan, combine the contents of this jar with 8 cups of chicken broth. If you have any leftover rotisserie chicken, turkey or ham, add this as well. Bring to a boil. Cover and simmer for about 50 minutes, or until tender. If desired, adjust the seasoning to taste by adding salt, pepper, or other spices. The next day, add more broth to any leftovers. Serves 4.

Jackie’s Spicy Meatballs

A dear family friend of mine makes the most DELICIOUS meatballs.  I get hungry just thinking about them!  I hope she doesn’t mind me posting the recipe, because this one is a keeper.  It’s a very forgiving recipe – I substituted a few wheat-free ingredients (since I couldn’t find gluten-free worcestershire sauce) but it was still delicious and easy.  You can even make them up the night before and bring them for a pot luck.  A few months ago, I didn’t have enough time to make the actual meatballs, so I cheated and bought some frozen meatballs and made the sauce.  They were a hit!  There wasn’t a single meatball leftover 🙂  They have a nice spicy kick to them and are very flavourful.  Thanks Taylor Family!  You guys make the most delicious food!


Ingredients

Meatballs (if you have your own meatball recipe, you can also use that):

2.5 lbs ground beef

1 cup bread crumbs (I use cornmeal usually, but about 1/2 cup)

½ cup milk

2 eggs

1 medium onion chopped

2 cloves garlic chopped


Meatball Sauce:

2 cloves garlic, minced

2 tbsp worcestershire sauce (I used gluten-free BBQ sauce instead – hard to find GF worcestershire sauce!)

2 tbsp butter​​

​2 tbsp prepared mustard

1 cup ketchup​​​

2 teaspoons celery seed

1 teaspoon chilli sauce​​ ​(I used sambal oelek)

½ teaspoon salt

4 tbsp brown sugar​​​

1 teaspoon lemon juice

Combine the ingredients for the meatballs.  Form into 1″ balls and place on a greased cookie sheet.  Bake at 400 F for 20 minutes, or until meatballs are cooked through and no pink remains.

While the meatballs are cooking, saute the garlic in butter. Stir in all remaining ingredients and bring to a boil (stir constantly so that the sauce doesn’t burn).  Add meatballs and toss until they are all coated.  Simmer 30 min until heated through.

GARLIC!!!


Ready to Bake


Saucy...

A (knitted) Partridge in a Pear Tree

I know Christmas is over and I have already cleaned the house out of the decorations for this year!  But this is one project I wanted to try before Christmas but didn’t get the time.  I ended up knitting these quickly a few days after, and I regretted not trying it earlier!  This cute partridge and pear are so easy and fast to make, and would make fantastic little gifts.  I got the pattern from patonsyarns.com – you can find the link here, but you will need to sign up with your email first (it’s free).  So cute and so much fun!

Partridge and Pear... in a tree

Gingerbread Houses

Last year I posted a recipe for Gingerbread Houses and Royal Icing…  And today I had some great friends over to put those recipes to work!  Here is a sample of our creations… Andrea was able to find some super fun ‘Ninjabread Men’ cookie cutters, so we had a lot of fun with those.  Chelsea also got a fantastic Gingerbread House mold, and it made a cute house with the windows, shingles and doors pressed into the cookies.  Thanks ladies for a fun day!

Ninjabread ATTACK!

Makes you just want to eat it!!!

Stealth-like Ninjabread Men...


Cranberry Sauce – The Real Deal

I’ve decided to post a medley of my favourite Thanksgiving recipes, in honour of our Canadian Turkey Holiday this weekend.  I tell you, Thanksgiving is one of my favourite holidays, because the food is just as good as Christmas, but there is no stress about bringing gifts.

So, like many of us, I am usually the person who “makes” cranberries for the Big Turkey Day by, well, opening up a can of cranberries, sliding the huge gelatinous mass into a bowl, and to avoid the can-shape, I smash it down with a fork.  Done.  Easy.  Right?

Well, yes.  BUT, the last few years I have noticed more grocery stores carrying fresh cranberries, so decided to see if it would be easy to make… and boy… it is easy and delicious!  The cranberries have the most wonderful sweet and tart flavour and they go perfectly with the meal.  Try it – it’s practically foolproof and the results are worth it!

Ingredients:

3 cups fresh cranberries (12 oz/340 g package will do – I used 1 package)

1 cup sugar

1 cup water

Rinse cranberries and set aside.  In a saucepan, mix sugar and water and bring to a boil over medium heat.  Boil the sugar/water mixture for 5 minutes, to create a syrup.  Add cranberries and boil gently.  You’ll hear the skins start to pop after about 5 minutes.  Cook for 3-5 minutes longer, until desired consistency.  Serve warm (drool) or refrigerate.  Makes about 2 1/2 cups.

Cranberries... love the popping sound they make!

Cranberries, ready to eat!

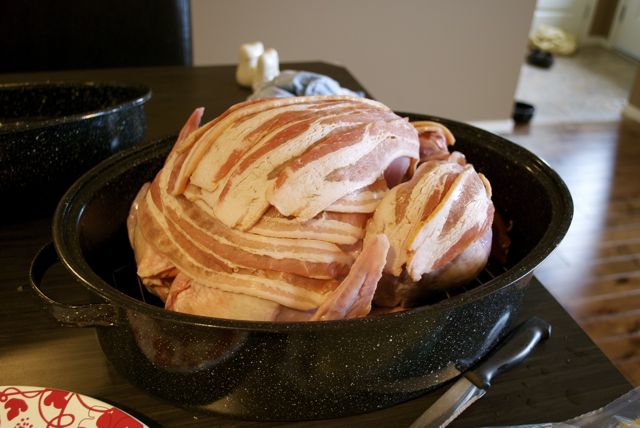
Bacon-Wrapped Turkey

This is less of a recipe, and more of a tip.  I discovered this a few years back after seeing it in a magazine at the grocery store.

We all know that bacon has many, many, many delicious uses, right?  Well here is another one.  When cooking your turkey, wrap the top in bacon in order to keep the turkey moist.  The bacon keeps the juices from evaporating and the turkey tastes so delicious!  Plus, you end up with a bunch of snacking bacon pieces that you can munch on while it’s being carved 😉

When cooking your turkey with bacon on it, make sure you remove the cover for the last 1/2 hour or so, to brown the top and make it crispy and delicious!

Bacon Wrapped Turkey, before cooking

Cooked and ready to eat! Yum.

Stuffing

This is our favourite, tried and true stuffing recipe.  It’s nothing fancy, but I think it is the most delicious stuffing ever!  The key is to use a LOT of sage.  The measurements are approximate since we usually make it from memory.  The taste-as-you-go method works great here!  I have also substituted using spelt bread in place of white or whole wheat bread, and it is equally good.

2 loaves bread, preferably day-old

1 small onion

3-4 stalks of celery

4-5 slices bacon

LOTS of sage

Salt and pepper to taste

Water – about 1/2 cup depending on how dry the bread is and the texture you like

Tear the bread into small, bite size pieces and set aside in a large bowl.  Chop celery and onion.  Slice bacon into 1/4 inch pieces.  Over medium heat, fry bacon until almost crispy (it will get a bit crispier when it bakes so better not to over-cook it) and set aside.  Using the pan drippings from the bacon, cook the celery and onions until soft.  Add bacon, celery and onions to the bread and stir to combine.  Add sage, salt and pepper.  Taste the stuffing and keep adding spices until you get a nice, flavourful stuffing.  Add water to the stuffing mixture to obtain a slightly sticky, but not wet consistency.  Place stuffing in a casserole dish and back, about 20 minutes, covered until hot.  Be careful not to over cook or it will become too dry!

Stuffing, before cooking!

Jello Salad: Pink Salad

A true prairie tradition is Jello Salad.  It sounds hokey, but really, if you grow up in Western Canada in the prairie provinces, a holiday meal will usually include at least one (if not several) jello salads.  I didn’t realize that this was specific to Western Canada until I had a friend come over from the Maritimes for Christmas dinner… and instead of eating it with the meal, he thought it was dessert!!!

One of our favourites, a must-have, is Raspberry Jello Salad, affectionately known as Pink Salad in our family, because of it’s bright pink colour.  This salad is not for everyday… one bite alone will raise  your blood sugar.  But for Thanksgiving, Christmas and Easter… Pink Salad is as necessary as mashed potatoes and gravy!  Usually the recipe gets doubled since it doesn’t last very long!

1 – 3 oz package of raspberry jello (the smaller packages)

3/4 cup boiling water

1/4 cup sugar

15 oz package frozen raspberries in syrup (thawed)

1 cup whipped cream or 1 envelope of Dream Whip

1 cup small marshmallows

Dissolve jello in boiling water, add sugar.  Stir to dissolve.  Stir in raspberries.  Chill until syrupy, stirring once or twice (at least 1 hour).  Whip cream until stiff.  Fold into thickened jelly.  Fold in marshmallows.  Chill several hours (at least 3 hours before serving).

Chocolate Cake

Simple. Delicious.  Need I say more?

Ingredients:

1 cup sugar

1/4 cup butter

1/4 cup cocoa

1 egg

1 tsp baking powder

1 tsp baking soda

1 tsp vanilla

1 1/4 cups flour

1 cup boiling water

Cream butter and sugar.  Add cocoa.  Blend in egg.   Add vanilla and dry ingredients.  Mix well.  Add boiling water last, beat.  Pour in an 8X8 cake pan or cupcake pan.  Bake at 350 for 30-40 min.

Allergy note: I have made this with spelt flour before.  The taste of the cake comes out essentially the same, although the cake doesn’t rise as much as with regular flour.